2012年9月7日 星期五

JFire.org(二)-除錯及安裝Eclipse

安裝完Eclipse後,還是有誤!!
 
 
六、為了除錯我以為是沒裝Eclipse的關係,馬上去下載來裝~
 
但在這之前,我又把Java JDK重新安裝了一次。


七、將下載下來的Eclipse解壓縮
指令:tar -zxvf eclipse-jee-qalileo-SR2-linux-gtk-x86_64_NL-SDK Subclipse.tar.gz

八、開啟這畫面之前,會有一個路徑,先使用預設


九、Ensure that your default installed JRE in Eclipse points to JDK 6.
 
To verify that, in Eclipse open Window > Preferences > Java > Installed JREs,
 
check if the Java 6 is selected as default.


十、After starting your SDK , please choose in the main menu:
 
File => New => Other... => NightLabs => Workspace


 安裝中,裝…超久的!!!


參考網址:
https://www.jfire.org/modules/phpwiki/index.php/Development%20Environment%20Setup

2012年9月6日 星期四

JFire.org(一)-安裝

 
一、 先下載檔案,然後安裝JFire.org
(Download file, and installed the JFire.org)
 
指令:java -jar jfire-max-server-jboss-installer_1.2.0_farnsworth.jar


二、選擇Typical按鈕
 
(Choos the Typical button)


三、輸入Mysql的帳密
 
( Input ID and password to mysql)


四、必須要輸入密碼
 
(Must enter the password)


五、安裝過程中發生錯誤,An error occured: Server finished unexpected
 
(Installed error)


2012年9月4日 星期二

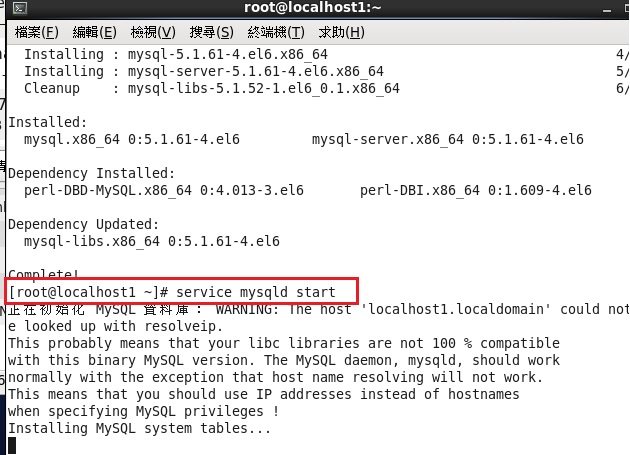
CentOS6.2(七)-安裝MySQL

 
一、安裝myqsl
 
指令:yum install mysql mysql -server


安裝成功


二、啟動mysql
 
指令:service mysqld start 


三、使用root帳號登入測試

 
指令:mysql -u root
 
指令:show databases


參考資料網址:

安裝MYSQL
http://iammic.pixnet.net/blog/post/6159632-centos-5-mysql-%E5%AE%89%E8%A3%9D

2012年9月2日 星期日

JFire.org-安裝前準備

終於開始動工了,我從JFire.org先開始,因為它是用Java寫的~

想說,可能會比較好上手~~((自己想的!!))

測試系統:CentOS 6.2

ERP:JFire 1.2.0 Farnsworth (Latest Release)

所要安裝的程式:

1、Java 版本:6.0, 7.0

2、DataBase
      MySQL(strongly recommend MySQL for productive systems)
      or
      Derby(use for test purpose)
     
      流程:
      □、 MySQL must be installed before installing the JFire server.

      □、 In principle, all database servers that work with DataNucleus are fine, but must be

             configured.

      □、After having MySQL installed (currently "JFire1.2.0 Farnsworth" support 5.x) 


3、Apache Derby:

     是Apache軟體基金會所研發的開放源碼資料庫管理系統;
     由於Derby是一個純Java程式,因此只需要操作系統支援Java虛擬機,
     Derby便可執行。


參考網址:

一、Server Installation:https://www.jfire.org/modules/phpwiki/index.php/ServerInstallation

二、http://blog.xuite.net/ouapp404/Java/29117951-JFire+%E5%AE%89%E8%A3%9D+

三、http://zh.wikipedia.org/wiki/Apache_Derby

2012年8月29日 星期三

CentOS6.2(六)-將samba改有密碼測試

CentOS(六)-將samba改有密碼測試
 
今日測試登入資料夾要有帳號密碼的,實驗流程如下
 
後來發現到資料夾key帳密登入的,只抓windows 2000的圖沒抓到windows 7的,
 
但其實二個測試都是成功可使用的。
 

一、security=user
 
二、以下資料保持CentOS(五)章節的資料不更改

 
三、將smb及nmb重啟
 
 
六、新增smb1帳號及密碼

 
七、然後發現到登不進去,但會跳視窗說要輸入帳密


八、後來又加了個pdbedit -a -u smb1及密碼,就登入了,所以要七跟八一起配合嗎?


(Windows 7 偵測到CentOS)


(Windows 7 點開,裡面的資料夾)
 
 
 (Windows 2000偵測到CentOS6.2的電腦)
 
(Windows 2000 點開,裡面的資料夾) 
 

九、測試過程中,我只單純的新增smbtest1這帳號及密碼,
指令是pdbedit -a -u smbtest1,但只有這樣的話,在Myserver97下輸入smbtest1的帳密後,是拒絕進入的。


2012年8月15日 星期三

CentOS 6.2(五)-安裝SAMBA


CentOS 6.2(五)-安裝SAMBA

Function: set up a documents file server

I prepare three machines, two Operation systems for CentOS and one  Windows 7 system, 

改:

I prepare three machines, two of which equip with CentOS and the other one is windows 7


To major of test windows 7 Network Neighborhood to whether measuring two CentOS Operation systems inside /temp folder, and create file inside /temp forder 

改:
The object is tesing win7 Network Neighborhood can connect to /temp folder in each two centOs machine or not, and create files in temp folder 


我準備了三台機器,二台CentOS,一台Windows 7

主要是要測看Windows 7網芳有無測到這兩台CentOS內的/temp資料夾,及新增檔案在temp資料夾內。


一、先下指令rpm -qa | grep samba查看有無安裝samba


二、我後來整個測試完後,我再下了一次yum install sasmba指令,
       
       因為好像有些東西沒裝到~無法執行!!!

       (原本以為重新安裝設定會不見,沒想到還在,剛好不用再重設定一次)


安裝成功


三、下指令編輯smb.conf設定

        1、cd /etc/samba
        2、vim smb.conf


四、啟動相關服務


五、因為我架設了兩台練習,所以以下兩張圖都是用CentOS 6.2架設SAMBA


六、進入MYServer97測試,在裡面新增一個abc 文字檔。

七、左邊是Windows 7,右邊是CentOS 6.2,有同步,測試成功~~~


參考資料:

鳥哥Linux私房菜
http://linux.vbird.org/linux_server/0370samba.php#server

2012年8月7日 星期二

CentOS 6.2(四)-Windows from CentOS login using rdesktop

測完xrdp後,接下來就在CentOS 6.2內安裝rdesktop

因為CentOS 6.2有內建,所以我直接下指令後,就裝完了,

前後花不到5分鐘,非常的快速~

一、指令:yum install -y rdesktop


二、會顯complete代表有安裝成功,接下來就可以測試了

指令為:rdesktop -u landy 192.168.1.38:3389

□landy是我的pc測試帳號
□ 192.168.1.38(要連線電腦的IP)
□3389為遠端桌面的Port 


三、因為我遠端桌面沒有將landy帳號加入,所以才會顯示如下訊息,在Windows 7將landy加入後,就可以連線了!!^^